
Intro
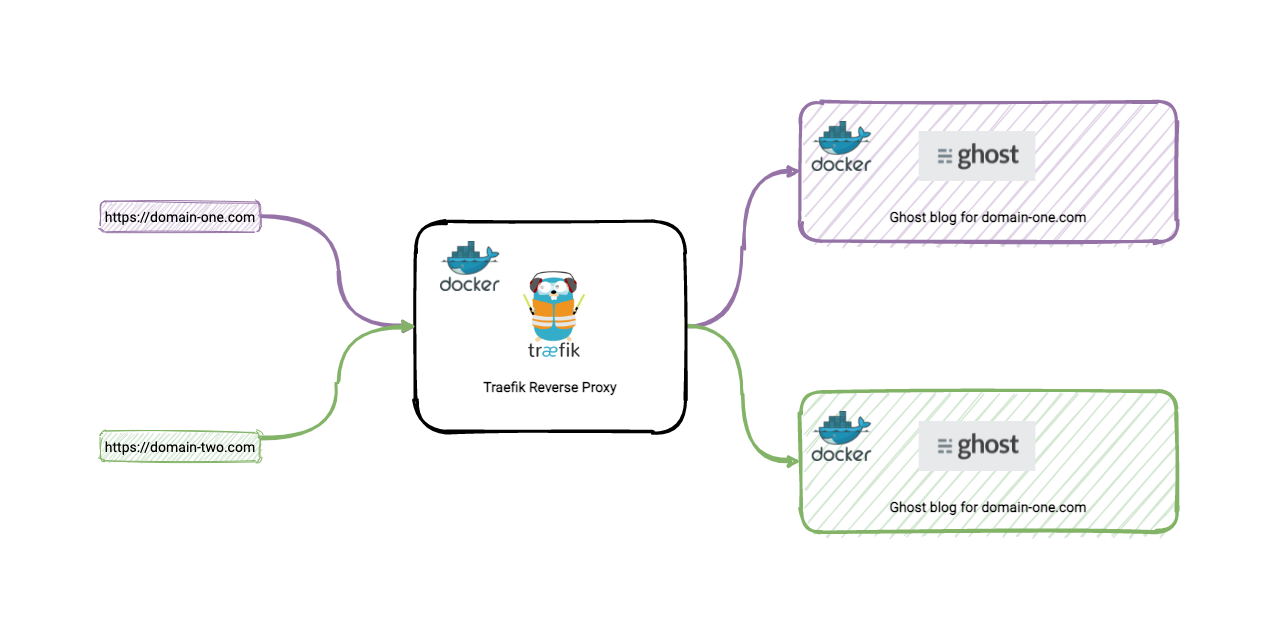
Following on from my previous blog posts How to setup a Linux machine with Docker on DigitalOcean for $5 and Getting started with Traefik as an alternative and easy to use reverse proxy. This is a follow up on how it’s possible to host multiple Ghost blogs under one machine. And yes, you can have multiple domain names. All pointing to a single machine. This is all achievable with Traefik and Docker.
I’ve managed to pull this off with this blog chlee.co and my other blog chuenl.com and another side project blog.officemixer.app
This is a great way to save money if you ever have the need of hosting multiple ghost blogs for a single machine.
Prerequisites
- You will need a machine, VPC, or server. I’m currently using DigitalOcean as it’s relatively cheap at just $5 per month. Feel free to use my referral code, which should give you $100 in credit to get you started.
- Docker and Docker Compose installed. DigitalOcean makes this easy with their pre-made droplets. You can follow instructions on How to set up a Linux machine with Docker on DigitalOcean for $5
TLDR
Feel free to jump to the final configuration section to view the final product.
Alternatively, they are available on my GiHub repo
Create a Docker network
We need to create a Docker network so that all containers share the same network.
docker network create web
To confirm and the network has been created, you can list the networks using the following command.
docker network list
Configure and get Traefik up and running
Create a docker compose file such as docker-compose-traefik.yml with the following contents.
version: "3.3"

services:

  traefik:
    image: "traefik:v2.4"
    container_name: "traefik"
    command:
      # enable insecure api. Only for testing. You can access it via http://the-ip-address:8080
      - --api.insecure=true

      # enable dashboard api
      - --api

      # enable docker as a provider
      - --providers.docker=true

      # set to false to not expose all docker containers to traefik
      - --providers.docker.exposedbydefault=false

      # set this to the 'web' network
      - --providers.docker.network=web

      # enable default http port 80
      - --entrypoints.web.address=:80

    ports:
      # This is the default port http
      - "80:80"

      # The default port to access Traefik's monitoring dashboard
      - "8080:8080"

   # add the 'web' network
    networks:
     - web


    volumes:
      - "/var/run/docker.sock:/var/run/docker.sock:ro"

    labels:
      - "traefik.enable=true"

networks:
  web:
    external: true
This is a basic Traefik Docker Compose configuration which we will build on. In the configuration above, we are enabling the inbuilt web dashboard, opening ports 80, and 8080, associating the web docker network we created earlier, and enabling Traefik to use Docker containers.
Start Traefik
We can start Traefik with the following Docker Compose command.
docker-compose -f docker-compose-traefik.yml up -d
You can navigate to Traefik’s web dashboard using http://161.35.42.117:8080
Setting up SSL with Let’s Encrypt
Create a file called acme.json. Traefik needs this so that it can create and rotate certificates with Let’s Encrypt on your behalf.
Create a folder called in a desired location called letsencrypt.
mkdir letsencrypt
Navigate to this new directory.
cd letsencrypt
Create a file an empty file called acme.json within letsencrypt.
touch acme.json
Provide specific permission to the file.
chmod 600 acme.json
Modify Traefik to enable SSL
Next, we now need to modify the Traefik Docker Compose file to enable SSL and reference the acme.json file we just create in setting up SSL with Let’s Encrypt
See the modified configuration below.
version: "3.3"

services:

  traefik:
    image: "traefik:v2.4"
    container_name: "traefik"
    command:
      - --api.insecure=true
      - --api
      - --providers.docker=true
      - --providers.docker.exposedbydefault=false
      - --providers.docker.network=web
      - --entrypoints.web.address=:80

      ## Additional changes to enable SSL and Let's Encrypt.

      # define an entry point for SSL with the name of 'websecure'
      - --entrypoints.websecure.address=:443

      # define a http redirection entrypoint to use SSL i.e. 'websecure'
      - --entrypoints.web.http.redirections.entryPoint.to=websecure

      # define a http redirection scheme to be https
      - --entrypoints.web.http.redirections.entryPoint.scheme=https

      # define a certificate resolver called 'myresolver' and to use tls challenge to obtain ssl certificates
      - --certificatesresolvers.myresolver.acme.tlschallenge=true

      # set a valid email address for the certificate resolver.
      - --certificatesresolvers.myresolver.acme.email=your-email-adress@email.com

      # Set the path of the acme.json file. Mine is located relative to where this docker compose file is located.
      - --certificatesresolvers.myresolver.acme.storage=/letsencrypt/acme.json


    ports:
      - "80:80
      - "8080:8080"

      # enable portt 443 for SSL
      - "443:443"

    networks:
     - web

    volumes:
      - "/var/run/docker.sock:/var/run/docker.sock:ro"

      # Map the letsencrypt folder
      - "./letsencrypt:/letsencrypt"

    labels:
      - "traefik.enable=true"
networks:
  web:
    external: true
Restarting Traefik with SSL
If you have Traefik running already running from the earlier steps, we need to stop and start it so that is uses the latest configuration.
To stop Traefik we can use the down command.
docker-compose -f docker-compose-traefik.yml up down
To start Traefik, we can use the up command again.
docker-compose -f docker-compose-traefik.yml up -d
Configure a Ghost blog
To make things simple, we will use Ghost’s sqlite3 database configuration. This means we don’t have to set up another docker container with mysql. We’ll then map Ghost’s content to the host so that if there are any restarts required, the content will not be lost.
Create a Docker Compose file called docker-compose-blog1.yml
version: "3.3"

services:

  example1_blog:

    # We are specifying the Ghost Image to run
    image: ghost:4.3.3-alpine


    # map host port 9198 (external) to Ghost's default internal port 2368
    ports:
      - 9198:2368

    environment:
      # the url of your blog.
      url: https://example1.com

    labels:
     # tells Traefik to detect this docker container
     - traefik.enable=true

     # tells Traefik to look and match the host name example1.com
     - traefik.http.routers.example1_blog.rule=Host(`example1.com`)

     # tells Traefik to use the 'websecure' http router entry point.
     - traefik.http.routers.example1_blog.entrypoints=websecure

     # tells Traefik what certificate resolver to use - 'myresolver'
     - traefik.http.routers.example1_blog.tls.certresolver=myresolver

    volumes:

      # maps Ghost's data directory to the hosts directory.
      - /home/deploy/ghost_data/example1_blog/data:/var/lib/ghost/content

    networks:
     - web


networks:
  web:
    external: true
Take note of the use of the port mapping. We are using an external port of 9198 (this can be anything so long it’s not used). But it must map to Ghost’s default internal port of 2368.
Start it up
docker-compose -f docker-compose-blog1.yml up -d
Setup your DNS for your first blog
Now it’s time to set up your DNS. Make an A record with the ip address of where the server is located. If you server ip address is say 169.36.58.110. Then the DNS entries would look something like this:
| Type | Name | content |
|---|---|---|
| A | chlee.co | 169.36.58.110 |
| A | www | 169.36.58.110 |
As with DNS, it may take a few hours or even 24 hours. I generally use Cloudflare for DNS management. I find it easier and it’s free!
Configure another Ghost blog
Just like the first configuration, to have another or additional Ghost blog running on the same machine, we just need to expose it with another unused port.
So in the configuration below, we are using port 9199. Whereas in the previous configuration we were using 9198. And we keep Ghost’s default port of 2368. That is the magical part.
version: "3.3"

services:

  example2_blog:

    image: ghost:4.3.3-alpine

    # map host port 9199 (external) to Ghost's default internal port 2368
    ports:
      - 9199:2368

    environment:
      # the url of your other blog.
      url: https://example2.com

    labels:
     # tells Traefik to detect this docker container
     - traefik.enable=true

     # tells Traefik to look and match the host name chuenl.com
     - traefik.http.routers.example2_blog.rule=Host(`example2.com`)

     # tells Traefik to use the 'websecure' http router entry point.
     - traefik.http.routers.example2_blog.entrypoints=websecure

     # tells Traefik what certificate resolver to use - 'myresolver'
     - traefik.http.routers.example2_blog.tls.certresolver=myresolver

    volumes:
      # maps Ghost's data directory to the hosts directory.
      - /home/deploy/ghost_data/example2_blog/data:/var/lib/ghost/content

    networks:
     - web

networks:
  web:
    external: true
Setup your DNS for your second blog
Now it’s time to setup your DNS for the second blog. Just like the first time around, make an A record with the ip address of where the server is located.
| Type | Name | content |
|---|---|---|
| A | chuenl.com | 169.36.58.110 |
| A | www | 169.36.58.110 |
Disable Traefik Monitoring dashboard (optional)
This is optional. If you do not require Traefik’s fancy monitoring dashboard, you can simply turn it off. You can see that both --api.insecure= and --api are commented out below.
    command:
      #- --api.insecure=true                                             # disabled
      #- --api                                                           # disabled
      - --providers.docker=true                                          # enable docker as provider
Enable Auth on Traefik Monitoring dashboard (optional)
If on the other hand, you do like the Traefik Monitoring dashboard, it’s best to put it behind a password so it’s protected. This is optional of course. To do this, we need to enable basic HTTP authentication and create a username and password.
Create a username and password using htpasswd
1. Check if htpasswd is installed
htpasswd
2. Install htpasswd
sudo apt install apache2-utils
3. Create a username and password.
To create a username of say admin and the password of password123, the command will be like so:
htpasswd -nb admin password123
You should see something like this generated.
admin:$apr1$M/tkVVQs$.s3kR09/L5pWnPZDxM1PG.
Make a note of the above as we will use it next.
Add Basic auth to Traefik and provide username and password
With the username and password generated from [](#Create a username and password using htpasswd). We can modify the Traefik Docker Compose file with the following labels.
IMPORTANT NOTE With the password generated, if there are any dollar signs, they need to be escaped with an additional dollar sign.
so this:
admin:$apr1$M/tkVVQs$.s3kR09/L5pWnPZDxM1PG.
becomes this
admin:$$apr1$$M/tkVVQs$$.s3kR09/L5pWnPZDxM1PG.
The additional configuration is needed.
...
    command:

      # disable access to api via http
      #- --api.insecure=true

      # enable dashboard api for use when ssl is configured.
      - --api

...
    labels:
      - "traefik.enable=true"

      # Enabling the api to be a service
      - "traefik.http.routers.api.service=api@internal"

      # set authentication mode for access to traefiks api dashboard
      - "traefik.http.routers.api.middlewares=auth"

      # enable basic auth and provide username and hashed password generated by htpasswd
      - "traefik.http.middlewares.auth.basicauth.users=admin:$$apr1$$M/tkVVQs$$.s3kR09/L5pWnPZDxM1PG."
Assign a domain or sub-domain name and SSL on Traefik Monitoring Dashboard (optional)
If you would like to access Trafik via a domain name or even sub-domain, just add the following labels. You will need to add the relevant A record or CNAME.
...
    labels:
      - "traefik.enable=true"

      # set a domain or sub-domain name to access traefiks monitoring dashboard.
      - "traefik.http.routers.api.rule=Host(`monitor.your-domain.com`)"

      # tells traefik to use the 'certrersolver' to enable and use SSL
      - "traefik.http.routers.api.tls.certresolver=myresolver"
The final config
This is the final config for Traefik, with SSL, a sub-domain to access the monitoring dashboard with basic authentication enabled.
version: "3.3"

services:

  traefik:
    image: "traefik:v2.4"
    container_name: "traefik"
    command:
      # enable insecure api. Only for testing. You can access it via http://the-ip-address:8080
      #- --api.insecure=true

      # enable dashboard api
      - --api

      # enable docker as a provider
      - --providers.docker=true

      # set to false to not expose all docker containers to traefik
      - --providers.docker.exposedbydefault=false

      # set this to the 'web' network
      - --providers.docker.network=web

      # enable default http port 80
      - --entrypoints.web.address=:80

      # define an entry point for SSL with the name of 'websecure'
      - --entrypoints.websecure.address=:443

      # define a http redirection entrypoint to use SSL i.e. 'websecure'
      - --entrypoints.web.http.redirections.entryPoint.to=websecure

      # define a http redirection scheme to be https
      - --entrypoints.web.http.redirections.entryPoint.scheme=https

      # define a certificate resolver called 'myresolver' and to use tls challenge to obtain ssl certificates
      - --certificatesresolvers.myresolver.acme.tlschallenge=true

      # set a valid email address for the certificate resolver.
      - --certificatesresolvers.myresolver.acme.email=your-email-adress@email.com

      # Set the path of the acme.json file. Mine is located relative to where this docker compose file is located.
      - --certificatesresolvers.myresolver.acme.storage=/letsencrypt/acme.json


    ports:
      # This is the default port http
      - "80:80"

      # The default port to access Traefik's monitoring dashboard
      - "8080:8080"

      # enable portt 443 for SSL
      - "443:443"

    networks:
     - web

    volumes:
      - "/var/run/docker.sock:/var/run/docker.sock:ro"

      # Map the letsencrypt folder
      - "./letsencrypt:/letsencrypt"

    labels:
      - "traefik.enable=true"

      # Enabling the api to be a service
      - "traefik.http.routers.api.service=api@internal"

      # set authentication mode for access to traefiks api dashboard
      - "traefik.http.routers.api.middlewares=auth"

      # enable basic auth and provide username and hashed password generated by htpasswd
      - "traefik.http.middlewares.auth.basicauth.users=admin:$$apr1$$M/tkVVQs$$.s3kR09/L5pWnPZDxM1PG."

      # set a domain or sub-domain name to access traefiks monitoring dashboard.
      - "traefik.http.routers.api.rule=Host(`monitor.your-domain.com`)"

      # tells traefik to use the 'certrersolver' to enable and use SSL
      - "traefik.http.routers.api.tls.certresolver=myresolver"

networks:
  web:
    external: true
This is an example of a Ghost blog configuration.
version: "3.3"

services:

  example1_blog:

    # We are specifying the Ghost Image to run
    image: ghost:4.3.3-alpine


    # map host port 9198 (external) to Ghost's default internal port 2368
    ports:
      - 9198:2368

    environment:
      # the url of your blog.
      url: https://example1.com

    labels:
     # tells Traefik to detect this docker container
     - traefik.enable=true

     # tells Traefik to look and match the host name example1.com
     - traefik.http.routers.example1_blog.rule=Host(`example1.com`)

     # tells Traefik to use the 'websecure' http router entry point.
     - traefik.http.routers.example1_blog.entrypoints=websecure

     # tells Traefik what certificate resolver to use - 'myresolver'
     - traefik.http.routers.example1_blog.tls.certresolver=myresolver

    volumes:

      # maps Ghost's data directory to the hosts directory.
      - /home/deploy/ghost_data/example1_blog/data:/var/lib/ghost/content

    networks:
     - web


networks:
  web:
    external: true
This is an example of a second Ghost blog configuration.
version: "3.3"

services:

  example2_blog:

    image: ghost:4.3.3-alpine

    # map host port 9199 (external) to Ghost's default internal port 2368
    ports:
      - 9199:2368

    environment:
      # the url of your other blog.
      url: https://example2.com

    labels:
     # tells Traefik to detect this docker container
     - traefik.enable=true

     # tells Traefik to look and match the host name chuenl.com
     - traefik.http.routers.example2_blog.rule=Host(`example2.com`)

     # tells Traefik to use the 'websecure' http router entry point.
     - traefik.http.routers.example2_blog.entrypoints=websecure

     # tells Traefik what certificate resolver to use - 'myresolver'
     - traefik.http.routers.example2_blog.tls.certresolver=myresolver

    volumes:
      # maps Ghost's data directory to the hosts directory.
      - /home/deploy/ghost_data/example2_blog/data:/var/lib/ghost/content

    networks:
     - web

networks:
  web:
    external: true
Summary
I hope that has helped and if you want to backup your Ghost blog, feel free to check out my other post on how to automatically backup a self-hosted Ghost blog
The full example is available on my my GiHub repo
Enjoy!