
After having discovered Traefik accidentally via a simple HN comment from the community, I find it fantastic. It’s a great alternative and relatively simple to use reverse proxy and load balancer. Especially for dockerized web applications.
In my previous post I wrote about setting up Nginx as a reverse proxy as well adding SSL with Let’s Encrypt. Whilst that works, and Nginx is a great reverse proxy and it also provides load balancing as well as many other things, I personally found it tricky to configure in Docker. This is most likely due to my limited knowledge of Nginx and how to get it setup in a Docker container.
This is why I find Traefik relatively easier to setup and it has some great documentation on their website and also some basic concepts of Traefik which is really helpful.
In this post, I will describe how to setup Traefik as a reverse proxy in just a few minutes.
Pre-requisites
- A Linux machine
- Docker and Docker Compose installed
Create a Docker Compose file
In this example, I will be using Docker to launch Traefik. We shall start with a simple Docker Compose file as shown below.
Go ahead and create a Docker Compose file in a file directory of your choice like so:
nano /home/traefik/docker-compose-traefik.yml
Then add the following:
version: '3.4'

services:
  reverse-proxy:
    image: traefik:latest # The official Traefik docker image
    container_name: traefik
    command: --api --docker --docker.domain=docker.localhost --logLevel=DEBUG # Enables the web UI and tells Traefik to listen to docker
    ports:
      - "80:80"        # The HTTP port
      - "8080:8080"    #- "8080:8080" # The Web UI (enabled by --api)
    volumes:
      - /var/run/docker.sock:/var/run/docker.sock #So that Traefik can listen to the Docker events
This is the simplest configuration for Traefik. We specify the Traefik docker image with traefik:latest, followed by specifying a container name and a command. This setting tells Traefik to include its standard dashboard, which we shall see in a bit.
Launch Traefik
With the Docker Compose file saved, all you need to do is launch it.
docker-compose -f /home/traefik/docker-compose-traefik.yml up -d
Thats it!
Now go ahead to a browser and visit port 8080 which is Traefik’s dashboard and you should see something like this:
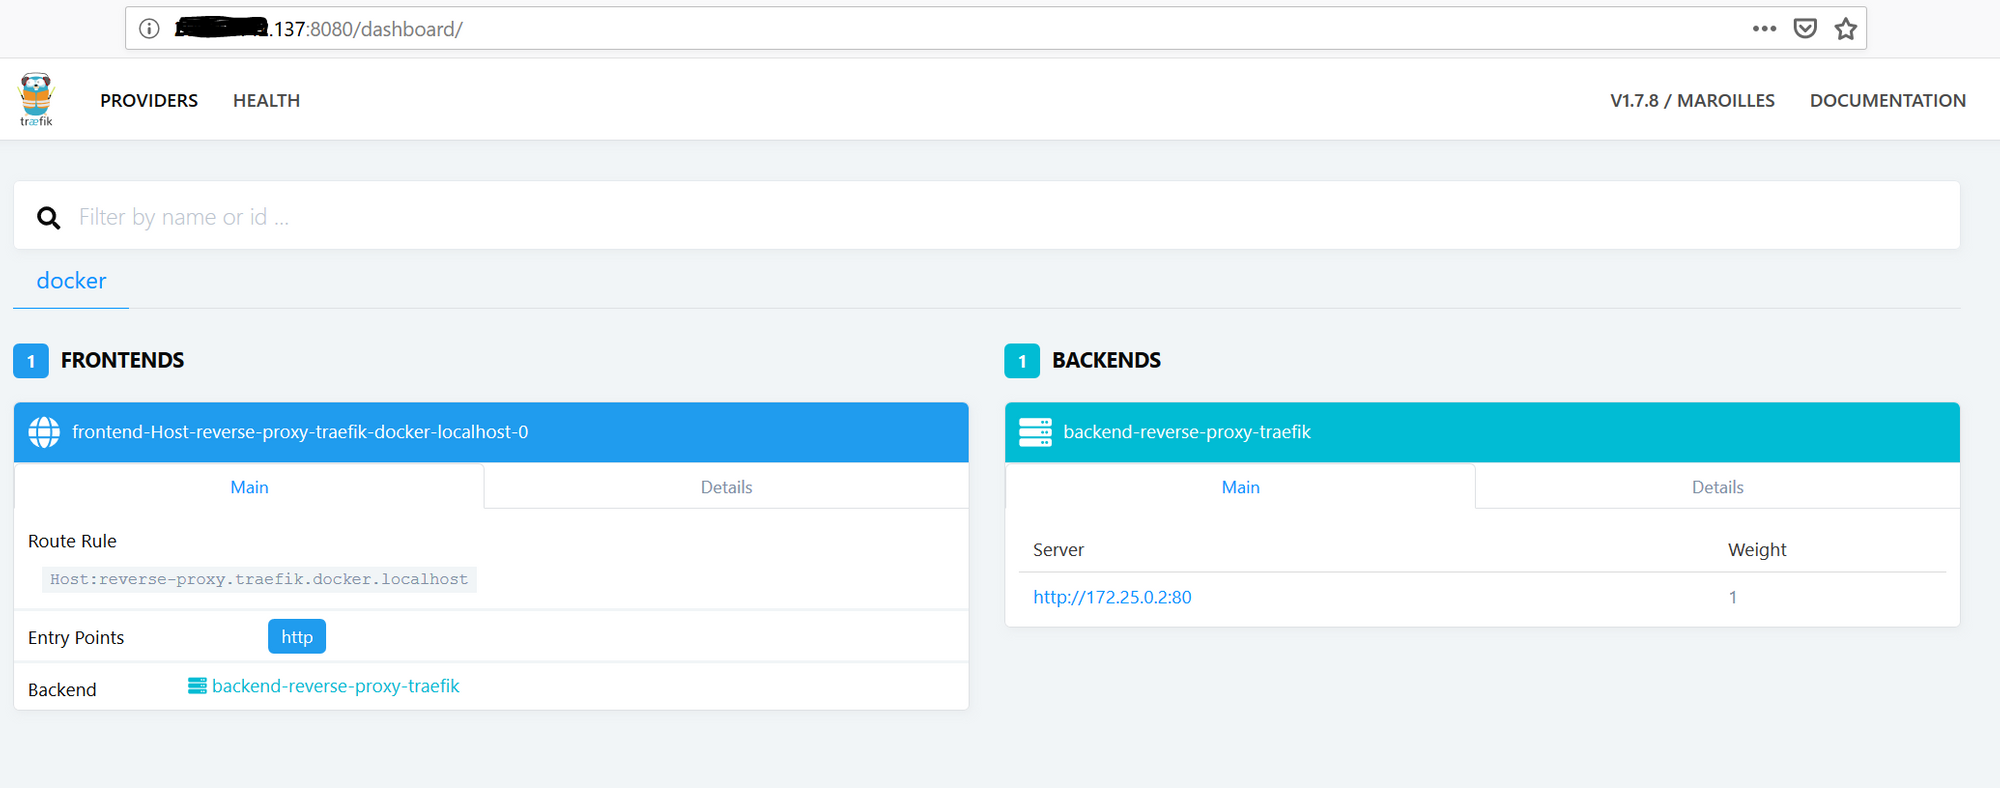
We’re done. Its that simple!
Add a Web app
To demonstrate how easy it is to add a web application so that Traefik recognises it and starts to route traffic to it, I am going to setup a sample ASP.NET core app.
Go ahead and create another docker compose file:
nano /home/traefik/docker-compose-web.yml
Then copy the sample Docker Compose file as shown below.
version: '3.4'

services:
  aspnetapp:
    image: microsoft/dotnet-samples:aspnetapp
    ports:
      - "81:80"
    labels:
      - traefik.backend=aspnetwebapp
The image I am using here is the classic ASP.NET Core app provided by Microsoft. Notice that the port I am exposing here is 81. This is so that we can visit the app via port 81.
Notice there is an additional labels section as part of the yaml file. This section is for Traefik to understand. Here I am just using a basic label which is optional and not required. But for demonstration purposes, I have added a backend label.
The Traefik website has many labels to configure from.
Launch the web app
Now, we can launch the service.
docker-compose -f docker-compose-web.yml up -d
If we run docker ps we should have two containers running as shown:
CONTAINER ID        IMAGE                                COMMAND                  CREATED             STATUS              PORTS                                        NAMES
eac6d7f37b03        microsoft/dotnet-samples:aspnetapp   "dotnet aspnetapp.dll"   25 minutes ago      Up 5 minutes       0.0.0.0:81->80/tcp                           traefik_aspnetapp_1
4364f5526b6c        traefik:latest                       "/traefik --api --do…"   36 minutes ago      Up 6 minutes       0.0.0.0:80->80/tcp, 0.0.0.0:8080->8080/tcp   traefik
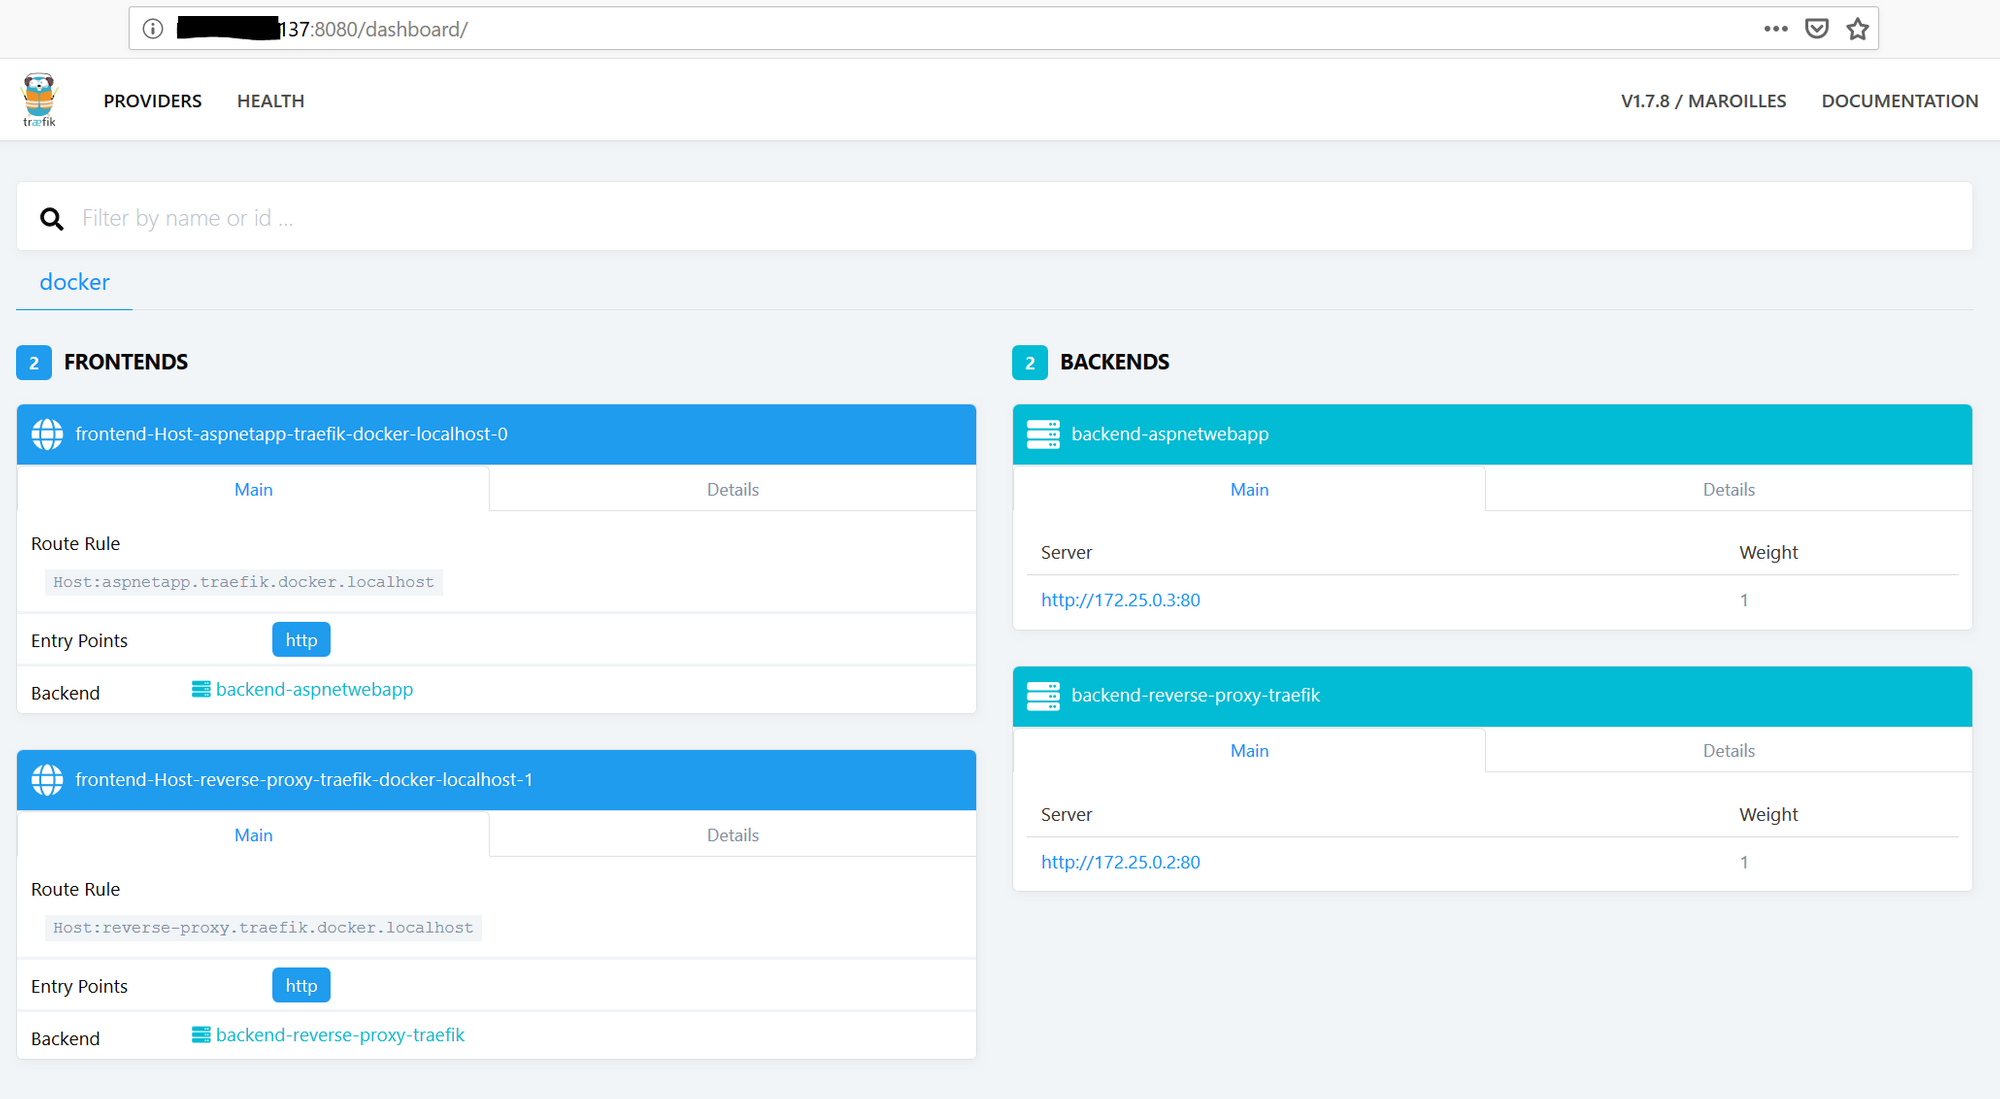
Now, if we re-visit the dashboard, you will have noticed Traefik has detected an additional docker container.
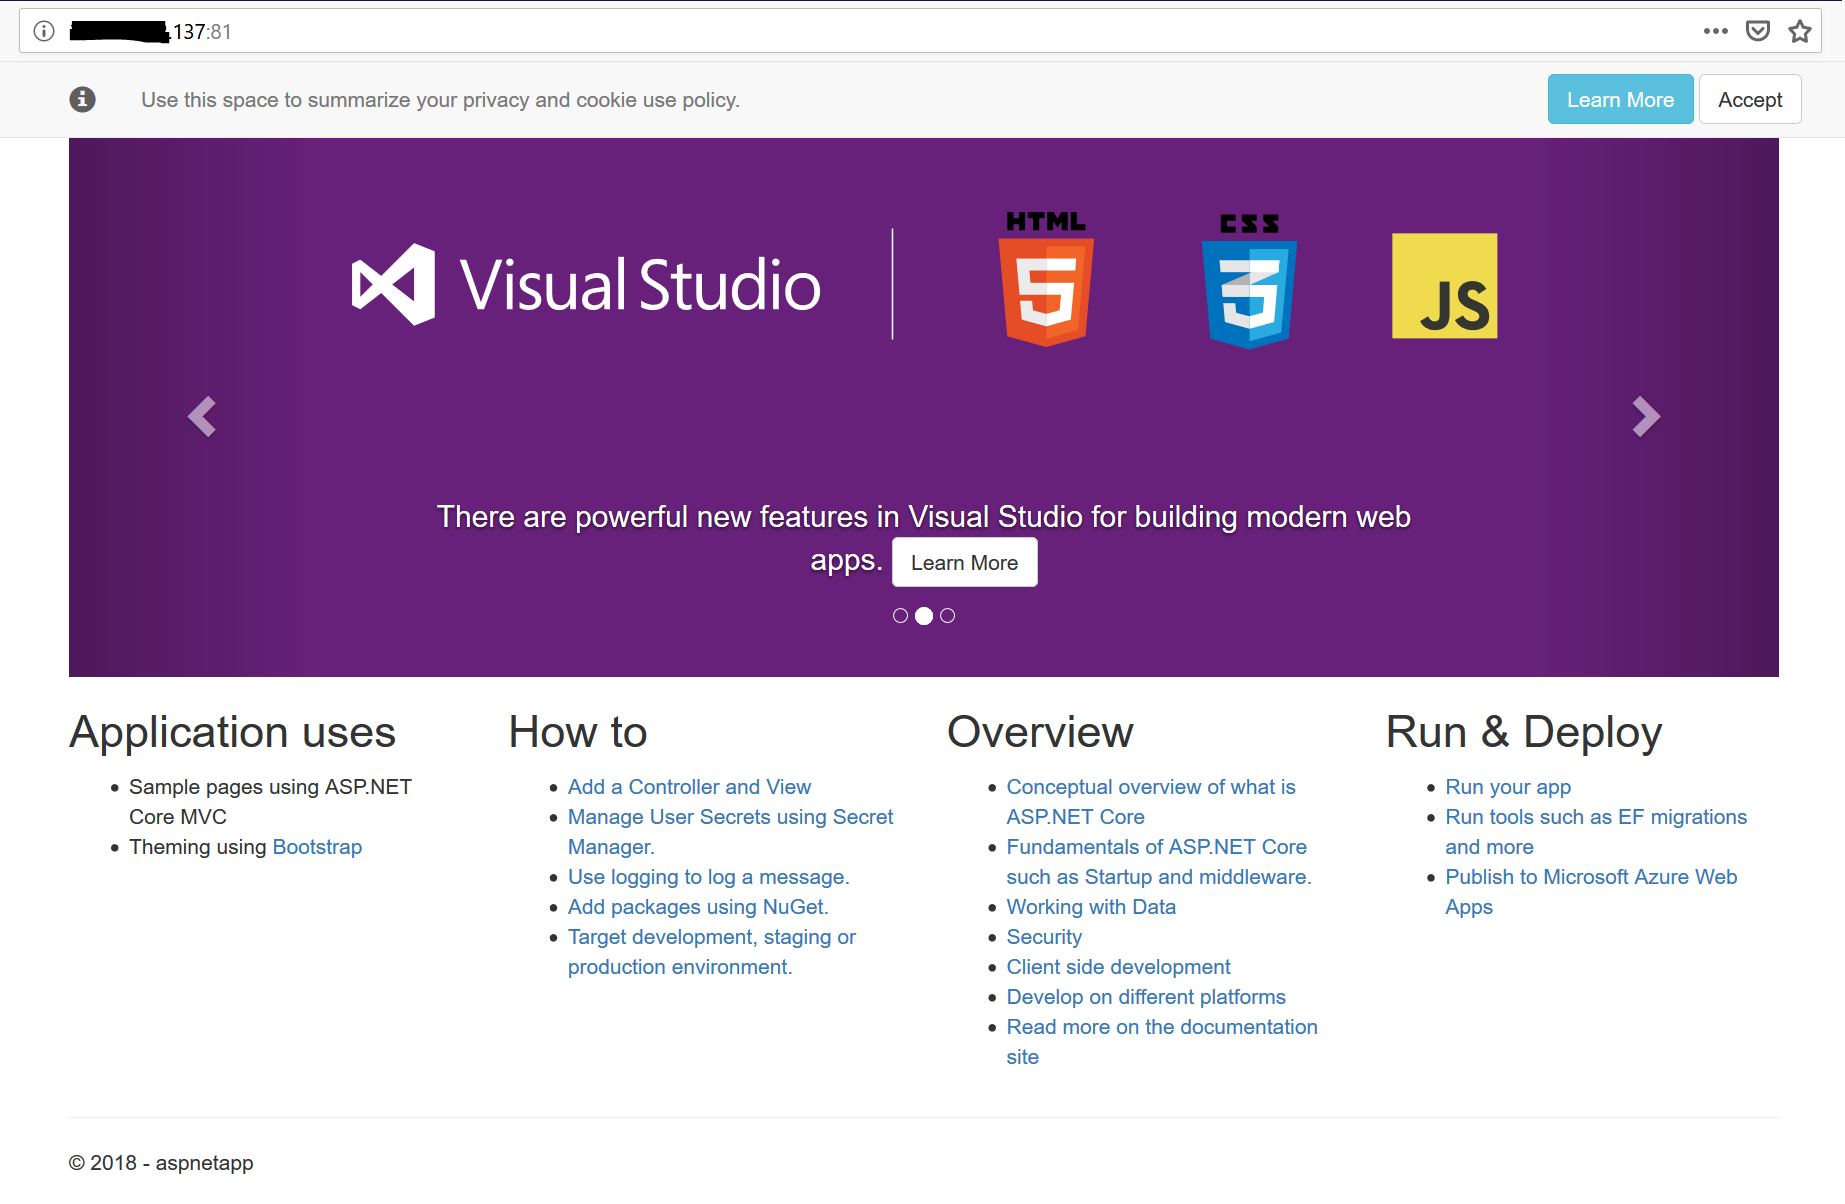
If we visit port 81, we should see the sample ASP.NET core application.
Adding Basic Auth Security to Traefik’s dashboard
Traefik offers Basic Authentication for web applications. This is great. However, passwords must be created using the htpasswd tool. The good news is that it doesn’t take long to generate or use.
Create a username and password using htpasswd
- You can check if you have
htpasswdinstalled by simply typinghtpasswdin the terminal.
htpasswd
- If you don’t have
htpasswdinstalled, you can install it by running the following command:
sudo apt install apache2-utils
- If I wanted a username of
adminand my super secure password to beJqhdsd2YDd74vVnn9sJBPoBV, then, the command to create a username and password would be:
htpasswd -nb admin Jqhdsd2YDd74vVnn9sJBPoBV
It will then output:
admin:$apr1$GbgwmElw$5H80qe5cCLtKdcpK5oi8L1
Make a note of this.
Create a basic TOML config file
Traefik uses a config file called traefik.toml. It uses the TOML format. You can find out more from the TOML Github repository.
Here, I’m going to demonstrate how to setup a basic traefik.toml config file so that we can add some basic authentication for Traefik’s dashboard.
- Create a basic
traefik.tomlfile. You can also start off with one provided by Traefik
nano /home/traefik/traefik.toml
- Enter the following:
################################################################
# Global configuration
################################################################

# Log level
logLevel = "INFO"

defaultEntryPoints = ["http"]

################################################################
# Entrypoints configuration
################################################################

# Entrypoints definition
[entryPoints]

  [entryPoints.dashboard]
    address = ":8080"
    [entryPoints.dashboard.auth]
      [entryPoints.dashboard.auth.basic]
        # This is where we set the username and password from the htpasswd tool
        users = ["admin:$apr1$GbgwmElw$5H80qe5cCLtKdcpK5oi8L1"]

  [entryPoints.http]
    address = ":80"

################################################################
# API and dashboard configuration
################################################################
# Enable API and dashboard
[api]
entrypoint="dashboard"
If you notice the [api] section are settings for Traefik’s dashboard.
Also, I have defined an entrypoint called "dashboard". I could have named this anything. But the important part is that whatever is set here, the entry point can be referenced in the entry points configuration.
So, if you notice in the entrypoints configuration, I have a section called [entryPoints.dashboard]. This is because I have a defined an entry point called "dashboard". If I have defined the entrypoint as monitoring, then to reference it, I would use [entrypoints.monitoring]. You can read more about entrypoints from Traefik’s website.
Then you will notice the auth setting [entryPoints.dashboard.auth] and this is where we enter the username and password we generated using the htpasswd tool earlier.
Modify the docker compose file
Now that we have defined the traefik.toml file, we need to modify the original docker compose file so that it references the file and also we no longer need to enable the dashboard via the docker compose file as it is now defined in the traefik.toml config file.
So the final file will be:
version: '3.4'

services:
  reverse-proxy:
    image: traefik:latest # The official Traefik docker image
    restart: always
    container_name: traefik
    ports:
      - "80:80"      # The HTTP port
      - "8080:8080"    #- "8080:8080" # The Web UI (enabled by --api)
    volumes:
      - /var/run/docker.sock:/var/run/docker.sock #So that Traefik can listen to the Docker events
      - /home/traefik/traefik.toml:/traefik.toml
    labels:
      - traefik.port=8080
      - traefik.frontend.rule=Host:reverse-proxy.traefik.localhost
Restart both docker containers
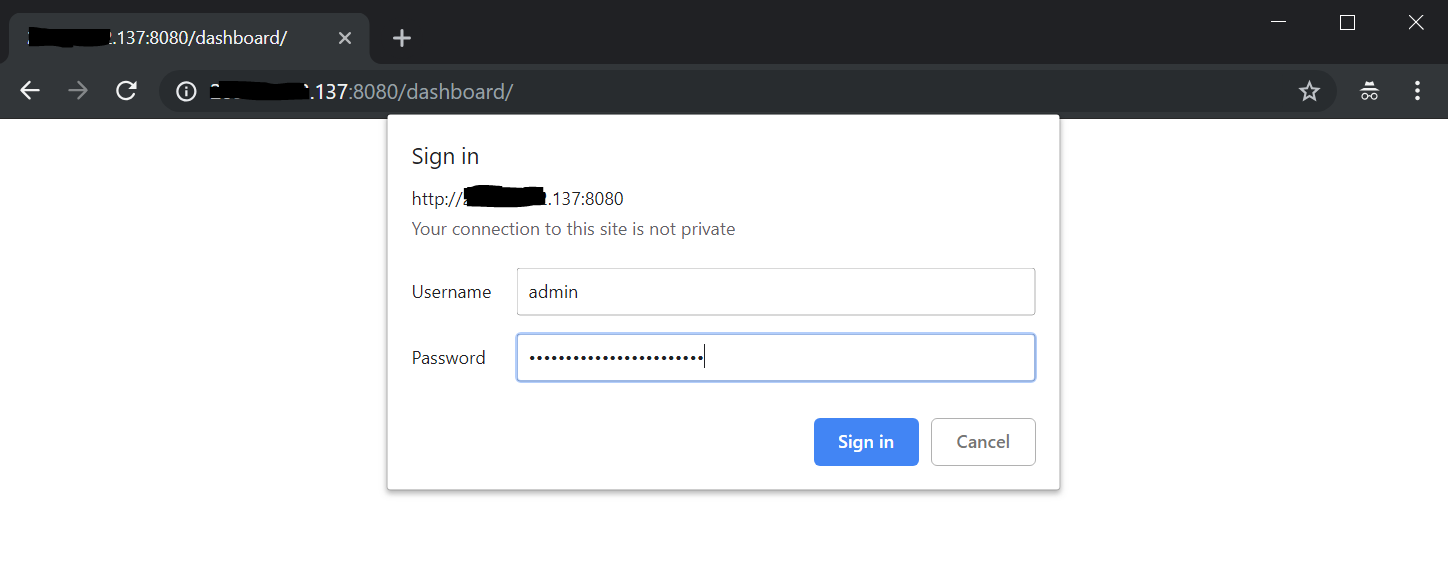
Stop the Traefik container earlier and restart it with the new configuration and if all goes well, you will be prompted with authentication as shown below:
Summary
I demonstrated how to setup Traefik as a reverse proxy within a few minutes and also configure its dashboard to have some basic authentication.
If you would like to explore more, Traefik’s website has a wealth of information to get started and more.